After I joined my college archery club in the fall of 2009, I began to explore the world of archery. I began rifling through videos on youtube, found some amazing archery forums, and got to know and learn from a professional bowyer. Throughout my explorations one form of archery kept me most interested, the English warbow.
The English warbow drew me in like it does most folks, with its draw weight. Ranging from 70-180 lbs, I was astonished to see men pulling these bows with such ease. The minimalist design of the warbow struck me as beautiful. So simple yet so very complex.
My first try at loosing a warbow came after a typical friday practice with my club. We had been shooting for around two hours when the owner of the property, who is also the bowyer mentioned above, came out to shoot with us. Him and I began talking and the conversation moved onto English warbows. He mentioned excitedly that he had one ready to go for a customer and that he would allow me to try it out. In my excited stupor I happily agreed and waited while he fetched the bow. When he returned, he held in his hands a hickory backed yew, English warbow with a #90 draw! My adrenaline was racing and as I held the bow for the first time the bond was sealed and I knew this was the type of archery I was made for. Using what knowledge I had gained from watching countless youtube videos, I took my first shot. The power of the bow felt immense! Compared to my #55 pyramid longbow, the #90 lb'er felt like a cannon! As mentioned above, my adrenaline was racing and I drew the bow without a hitch. When I loosed the arrow, it bolted away like a laser, and buried itself to the fletchings in the target.
I was hooked, and now there is no turning back! I have since immersed myself into the warbow culture and community.
here is a link to the bowyer mentioned above, Rudderbows Archery:
http://www.rbows.com/index.html
Monday, May 23, 2011


Tuesday, May 3, 2011
Good News! Starting a Rivited Maille Project!
Hello all and thanks for dropping by! My birthday recently past and I was graced with some wonderful gifts one of which is some rebar tie wire. To those of you medieval hobbyist out there this means one thing...RIVITED MAILLE! Yes, I have in my possession several hundred feet of blackened, annealed, 16ga steel rebar tie wire.
 Yes, it's beautiful but what it is to become will be even more spectacular.
The process:
I will wind the wire around a 1/4" mandrel into large coils about 1 foot long. It then look like a large spring. I will cut the ring individually with a pair of modified bolt cutters. The modification allows me to cut the rings so that there is an overlap. Then I will re-normalize the rings and begin the flattening process. That steel bar in the photo will be used in this step. With a tube just big enough to accomodate the bar I can place a ring at the bottom of the tube upon a steel surface and proceed to drop the bar upon the ring and flatten it. This will give a nice uniform flat ring. Then I will either punch a hole in the ring and use a cylindrical rivet or drift a hole and use a wedge rivet. The wedge rivet is more historically accurate, however.
So thats the crash course on rivited maille. I am so excited to start on this! Once I have a large enough piece of maille I plan on conducting some long range (50-100yards) armor penetrations test with my warbow :)
Thanks again for viewing! feel free to comment, ask a questin or two, and please let me know your reaction below!

The process:
I will wind the wire around a 1/4" mandrel into large coils about 1 foot long. It then look like a large spring. I will cut the ring individually with a pair of modified bolt cutters. The modification allows me to cut the rings so that there is an overlap. Then I will re-normalize the rings and begin the flattening process. That steel bar in the photo will be used in this step. With a tube just big enough to accomodate the bar I can place a ring at the bottom of the tube upon a steel surface and proceed to drop the bar upon the ring and flatten it. This will give a nice uniform flat ring. Then I will either punch a hole in the ring and use a cylindrical rivet or drift a hole and use a wedge rivet. The wedge rivet is more historically accurate, however.
So thats the crash course on rivited maille. I am so excited to start on this! Once I have a large enough piece of maille I plan on conducting some long range (50-100yards) armor penetrations test with my warbow :)
Thanks again for viewing! feel free to comment, ask a questin or two, and please let me know your reaction below!
Friday, April 29, 2011
Making a Warbow: progress report 1
Hello all,
Easter, April 24th, happened to be my birthday and my girlfriend graced me with a wonderful gift. A new 4 in 1 rasp! It works like a charm and I my muscles are very grateful to have a tool that does most of the work now, haha.
Below is a short video of me showing the current bend of my stave. The upper limb is on the righthand side of the video. I hold up 8 fingers to indicate that this is the 8th tiller video I've recorded. However, I've decided to stop using videos as a guide to the tillering process. After reviewing video 1 and 8, very little difference is visible in the bending of the stave. I believe the video scews the angle and therefore the viewpoint of how the stave is bending. If you'll notice how stiff the upper limb is near the tip, I have been scraping and rasping my heart away there, and noticed very little difference throughout the videos. As other people have suggested I will be getting a tillering stick at the least to help with the tillering process. Also, I am using a shorter string in this video as others have suggested.
On the whole, I'm glad with the way this stave is turning out. I wont be working on it any further until I get a tillering stick, just to avoid ruining the stave with my current methods. Thanks for checking in!
Easter, April 24th, happened to be my birthday and my girlfriend graced me with a wonderful gift. A new 4 in 1 rasp! It works like a charm and I my muscles are very grateful to have a tool that does most of the work now, haha.
Below is a short video of me showing the current bend of my stave. The upper limb is on the righthand side of the video. I hold up 8 fingers to indicate that this is the 8th tiller video I've recorded. However, I've decided to stop using videos as a guide to the tillering process. After reviewing video 1 and 8, very little difference is visible in the bending of the stave. I believe the video scews the angle and therefore the viewpoint of how the stave is bending. If you'll notice how stiff the upper limb is near the tip, I have been scraping and rasping my heart away there, and noticed very little difference throughout the videos. As other people have suggested I will be getting a tillering stick at the least to help with the tillering process. Also, I am using a shorter string in this video as others have suggested.
On the whole, I'm glad with the way this stave is turning out. I wont be working on it any further until I get a tillering stick, just to avoid ruining the stave with my current methods. Thanks for checking in!
Friday, April 22, 2011
Making a new WARBOW
I've had this stave for awhile and decided to start tillering it along! It boasts a hickory belly, Ipe core, and Bamboo backing. It is 76" long and 1 3/16" wide at the handle. I would like it to end up around #130@32" however anything over #90 would work.
 The upper limb is on the right side of the picture (the side with the vent). Both limbs appear to be stiff from mid-limb to the tips. I'll concentrate scraping there until an even bend is achieved.
I've been advised to used a shorter tillering string so I'll remedy that right away. That should help give a better idea of how the bow will bend at certain draw lengths.
I'll be making a series of post tracking the progress of this bow so check in periodically to see whats new. Please don't be shy! Comment!

I've been advised to used a shorter tillering string so I'll remedy that right away. That should help give a better idea of how the bow will bend at certain draw lengths.
I'll be making a series of post tracking the progress of this bow so check in periodically to see whats new. Please don't be shy! Comment!
Monday, April 4, 2011
Robert Hardy on the Medieval Longbow

The Military Archery at Neville's Cross, 1346
By: Robert Hardy
I found the following article to be a fascinating and insightful read. It brought up several interesting aspects of the medieval archer and logistics of military campaigning that I not previously thought of. Give it a read I'm sure there is something to be learned by all. Enjoy!
"The Military Archery at Neville's Cross, 1346." Medievalists.net. Themebuilder, 27 Jan 2011. Web. 4 Apr 2011. <http://www.medievalists.net/2011/01/27/the-military-archery-at-nevilles-cross-1346/>.
Thursday, March 3, 2011
Making a Medieval Arrow Bag, Part 2.
In this post I will provide the pattern and method for sewing a medieval arrow bag.
Materials needed
-At least 2 yards linen or canvas fabric. Linen being historicaly preferred.
-Appropriate needle for fabric weight.
-Pins, I only had two but more will definitely benefit you.
-Thread of similar color to fabric.
-Your arrow spacer
-A string for the top drawstring
-A leather string, aprox: 6 inches
Here is the pattern...
 A- This is the circumference of the arrow spacer and will be the width of the fabric. This is where the spacer will be sewn into the bag.
B- This is where the bottom of the bag will be tied to hold the arrows in. It is the same measurement as A.
C- Fold the fabric down along this line to make a space for the drawstring. It is the same measurement as A.
Step 1. Measure the circumference of your arrow spacer and add 1/2". As you can see mine measures 22" exactly. Mark measurement A.

Step 2. Figuring out where to mark B and C. To do this it is very handy to have an arrow on hand. Place the arrow on line A as if it where in the arrow spacer.
 Now we can mark measurement B and C in relation to the arrow. B should be marked about 3 to 5 inches below the tip of the arrow. Be sure that there is enough arrow above line A so that when you mark line B the arrow wont fall through the spacer when the bag is completed. The distance from A to B should be about 26 inches
Step 4. Fold the entire pattern in half length-wise. Starting at line A whip stitch all the way to the bottom of the bag.

Step 5. Now that we have the whip stitch completed, turn the bag inside-out. It will actually be outside-in but, ya know. Now we want to hem the bottom of the bag. To do this I turned the bottom edge of the bag inside on itself twice, so I would be sewing through three layers of fabric.
Step 6. Sewing in the arrow spacer. Place your spacer inside the bag and align it with line A. Spiral stitch the spacer into the bag.
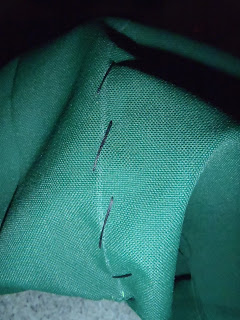


Okay, so that is all I can manage for the time being. Please let me know if this was helpful and if needed what do I need to change.
Thanks all!
Materials needed
-At least 2 yards linen or canvas fabric. Linen being historicaly preferred.
-Appropriate needle for fabric weight.
-Pins, I only had two but more will definitely benefit you.
-Thread of similar color to fabric.
-Your arrow spacer
-A string for the top drawstring
-A leather string, aprox: 6 inches
Here is the pattern...

B- This is where the bottom of the bag will be tied to hold the arrows in. It is the same measurement as A.
C- Fold the fabric down along this line to make a space for the drawstring. It is the same measurement as A.
Step 1. Measure the circumference of your arrow spacer and add 1/2". As you can see mine measures 22" exactly. Mark measurement A.

 |
| Marking measurement A |

 |
| Marking line B |
 |
| Marking line C. Line C would be the one that is farthest left. The other two are not needed, I was just experimenting. |
Step 3. Cut out the pattern. It should look just like the pattern up above. A simple rectangle with your lines A, B and C drawn on it.
 |
| The pattern as it should look before cutting out. |

 |
| The whip stitch almost completed. |
 |
| The double-rolled hem. |

 |
View from the top. |


Okay, so that is all I can manage for the time being. Please let me know if this was helpful and if needed what do I need to change.
Thanks all!
Monday, January 31, 2011
Military Archery In Medieval Ireland

Read the rest here:
Halpin, Andrew. "Military Medieval Archery in Medieval Ireland: Archaeology and History." Medievalists.net. Themebuilder, 29 Jan 2011. Web. 30 Jan 2011.
Subscribe to:
Posts (Atom)